This is part 2 of the Application Gateway NSG configuration series of posts
- Part 1: Creation of the App Service, Web App and deployment of the Go application
- Part 2: Making the Web App be accessible only from a private network
- Part 3: Deployment of the Application Gateway to expose the Web App to the internet and restrict the access to specific Public IPs.
Overview of this exercise
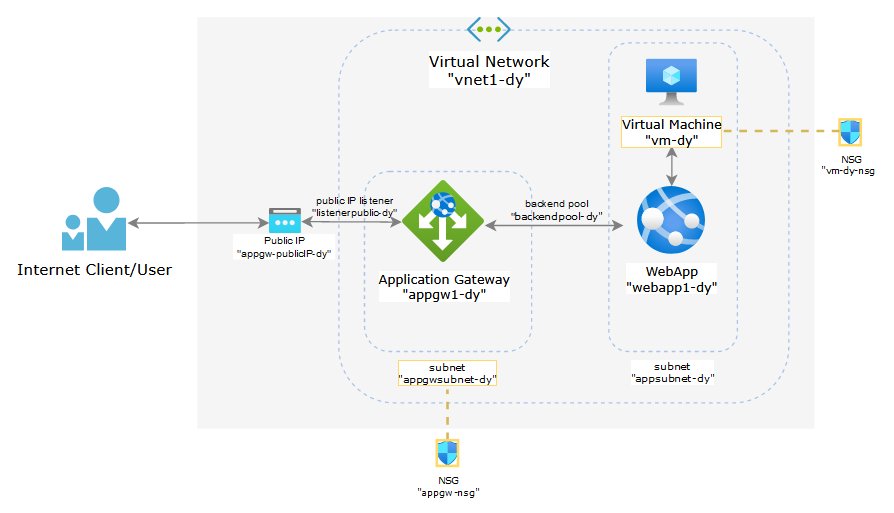
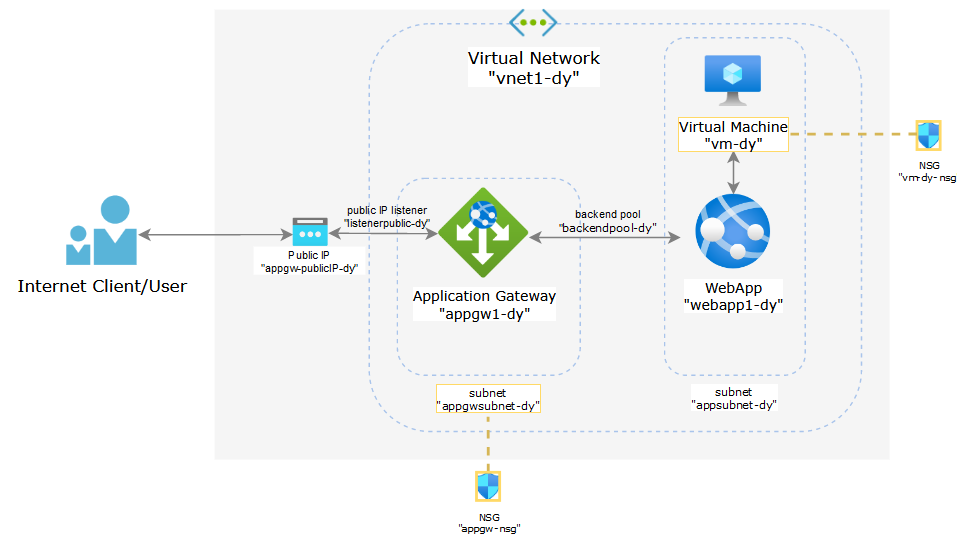
This is a generic configuration for a web application that needs to be accessed by internal users from a private network and also by specific external users from the Internet. The components used in this lab are as follows:
- Application Gateway V2: used for publishing the private web app to the internet
- App Services Web App: used for hosting a simple go application
- Virtual Machine: used for accessing the web app from the private network
- Virtual Network: used to represent the private network where the web app and internal users will be located
- Subnets: subnet “appgwsubnet-dy” needs to be dedicated for Application Gateway instances. Subnet “appsubnet-dy” will be used for the Web App and the Virtual Machine
- Network Security Group (NSG): the NSG attached to “appgwsubnet-dy” is used to restrict inbound traffic coming from the Internet to the Application Gateway. Then there’s the default NSG create for the Virtual Machine which will be attached y default to the NIC of the VM
1. Create a Virtual Network for the Web App
In the previous post we created a Web App that hosts a Go App that is accessible from the Internet with no restrictions on the network of the client
Now we need to make this Web App to be only reachable from an internal Vnet a not from the Internet. First we need to create a vnet.
Search for “virtual network” and click”Virtual Networks”

Click Create and select the same resource group and region where you we created the Web App:

In the IP Addresses section we will need to rename the default subnet with address range 10.0.0.0/24 and create a new one. In summary, we will use 2 subnets:
- “appgwsubnet-dy” with an address range of 10.0.0.0/24 which will be used for the application gateway
- “appsubnet-dy” with an address range of 10.0.1.0/24 which will be used for the backend Web App we created in the previous steps

Click on “default” subnet and configure the following settings:
- subnet name: appgwsubnet-dy
- subnet address range: 10.0.0.0/24
- leave the default values for the rest of the settings

Then click on “Add subnet” and create a subnet with the following settings:
- subnet name: appsubnet-dy
- subnet address range: 10.0.1.0/24
- leave the default values for the rest of the settings

Once the virtual network has been created we need to configure the Web App to use the “appsubnet-dy” subnet, go to Networking in the Web App Blade and select “Private endpoints”

Click “Add”

Configure the Private Endpoint with the following settings and the click Add
- name: privateendpointwebapp-dy
- subscription: same as Web App
- Virtual Network: select the Vnet created in the previous step, in my case “vnet1-dy”
- subnet: select subnet “appsubnet-dy” created in the previous step

You should see the created Private Endpoint:

After creating the Private Link the Inbound address will be an IP address from the selected subnet and no longer be a Public IP:

If you try to access the Web App from the internet it will be give you a 403 error. This app will only be accessible from a Vnet

2 Create a Virtual Machine attached to the vnet to access the Web App from the private network
To be able to access the Web App from a Vnet, we will create a Virtual Machine to test connectivity. Search for “Virtual Machine”

Configure the following settings for the Virtual Machine:
- name: vm-dy
- region: same as the Web App
- Image: Windows Server 2016 Datacenter – Gen2
- Size: Standard_B1s – 1 vcpu, 1 GiB
- username: select an username for the administrator
- password: select a password for the administrator user
- leave the rest of the setting by default

In the Networking tab, select the Vnet created in previous steps and select the “appsubnet-dy”, leave the rest of the settings by default and go to “Review + create” and then “Create”

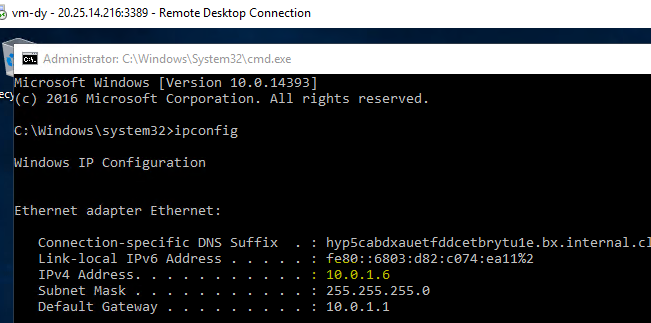
Once the Virtual Machine is created, connect to it through Remote Desktop and open a browser. Try navigating to the Web App default URL and the web app should load as expected.

If you notice the IP address of the Virtual Machine is an IP address from the same subnet as the Web App and can access it:

Leave a comment