This is part 1 of the Application Gateway NSG configuration series of posts
- Part 1: Creation of the App Service, Web App and deployment of the Go application
- Part 2: Making the Web App be accessible only from a private network
- Part 3: Deployment of the Application Gateway to expose the Web App to the internet and restrict the access to specific Public IPs.
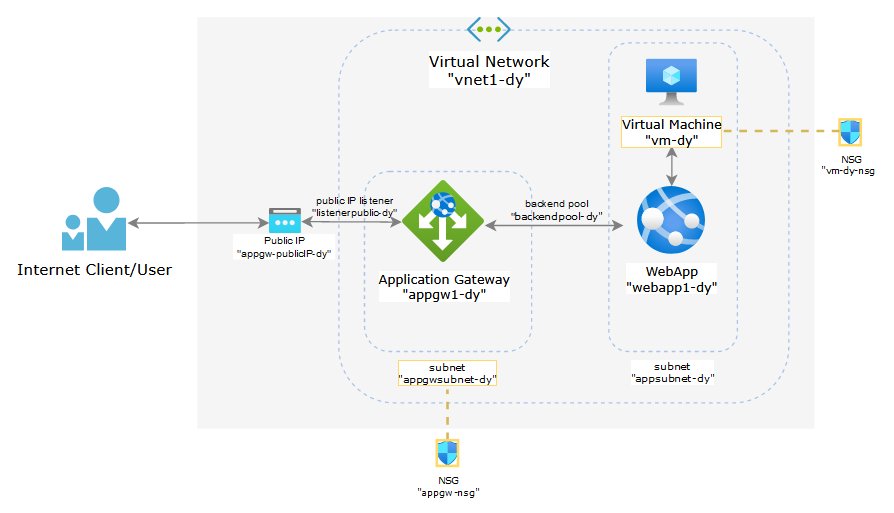
Overview of this exercise
This is a generic configuration for a web application that needs to be accessed by internal users from a private network and also by specific external users from the Internet. The components used in this lab are as follows:
- Application Gateway V2: used for publishing the private web app to the internet
- App Services Web App: used for hosting a simple go application
- Virtual Machine: used for accessing the web app from the private network
- Virtual Network: used to represent the private network where the web app and internal users will be located
- Subnets: subnet “appgwsubnet-dy” needs to be dedicated for Application Gateway instances. Subnet “appsubnet-dy” will be used for the Web App and the Virtual Machine
- Network Security Group (NSG): the NSG attached to “appgwsubnet-dy” is used to restrict inbound traffic coming from the Internet to the Application Gateway. Then there’s the default NSG create for the Virtual Machine which will be attached y default to the NIC of the VM
1. Create a Web App for hosting our backend
In your Azure Portal search for “app services” and select the “App Services” result, then click on “Create”

Create a New Web App with the following configuration (you might need to select a different name), make sure to select a Basic App Service Plan by clicking “change size”. After selecting the basic plan select “Review + create” and then Create

If you’re in a lab environment you might want to make sure that the Sku of the App Services is a Basic plan:

For this test we’re going to use a Docker image that runs a simple Go application that prints the “X-Forwarded-For” header from the request received. The image can be found in Docker Hub atelootmachine/simple-go-api. To deploy the container into the recently created Web App go to Deployment Center and point to the Docker Hub image, and then click “Save”.

If you’re trying with your own Docker Hub hosted image, make sure the latest tag exists, otherwise you will get a “Image pull failed” error in the Web Apps Deployment logs:
2022-06-25T21:54:59.820Z ERROR - Pulling docker image atelootmachine/simple-go-api failed: 2022-06-25T21:54:59.822Z WARN -Image pull failed. Defaulting to local copy if present. 2022-06-25T21:54:59.824Z ERROR - Image pull failed:Verify docker image configuration and credentials(if using private repository) 2022-06-25T21:54:59.827Z INFO - Stopping site webapp1-dy because it failed during startup. 2022-06-25T22:05:57.132Z INFO - Pulling image: atelootmachine/simple-go-api 2022-06-25T22:05:57.333Z ERROR - DockerApiException: Docker API responded with status code=NotFound, response={"message":"manifest for atelootmachine/simple-go-api:latest not found: manifest unknown: manifest unknown"}By default Azure Web App expects the application to listen on port 80. Since the Go app uses port 8080 we need to add the “WEBSITES_PORT” application setting. Go to “Configuration” and then on “Application settings” click “New application setting“. The application setting “WEBSITES_PORT” should be set as follows, then click on “Save”

The application setting will be added:

The app should be up and running on the default Web App URL, which you can find on the “Overview” section. In this case the default URL is “http://webapp1-dy.azurewebsutes.net”

You can now browse the web app from the internet, the Go app will print the IP from which the request was originated:


Leave a comment