This is part 3 of the Application Gateway NSG configuration series of posts
- Part 1: Creation of the App Service, Web App and deployment of the Go application
- Part 2: Making the Web App be accessible only from a private network
- Part 3: Deployment of the Application Gateway to expose the Web App to the internet and restrict the access to specific Public IPs.
Overview of this exercise
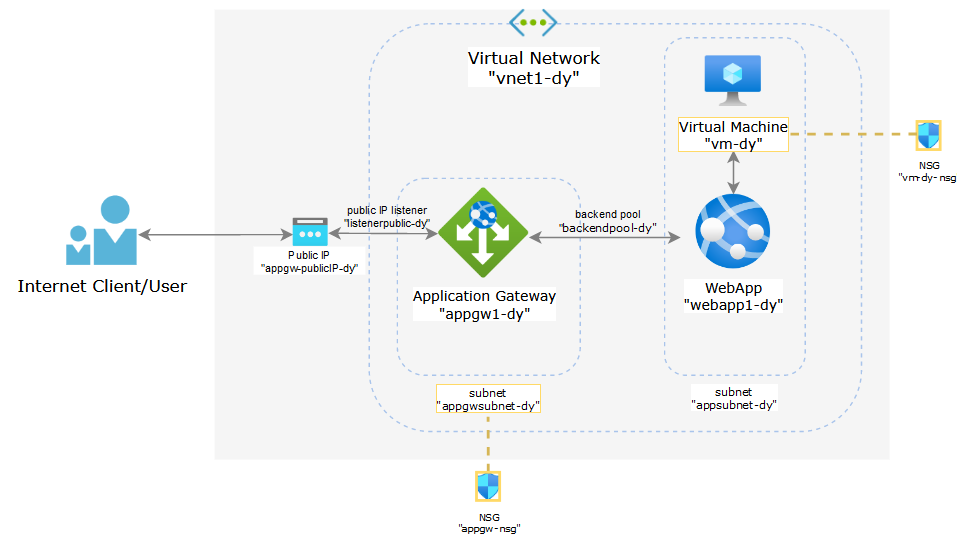
This is a generic configuration for a web application that needs to be accessed by internal users from a private network and also by specific external users from the Internet. The components used in this lab are as follows:
- Application Gateway V2: used for publishing the private web app to the internet
- App Services Web App: used for hosting a simple go application
- Virtual Machine: used for accessing the web app from the private network
- Virtual Network: used to represent the private network where the web app and internal users will be located
- Subnets: subnet “appgwsubnet-dy” needs to be dedicated for Application Gateway instances. Subnet “appsubnet-dy” will be used for the Web App and the Virtual Machine
- Network Security Group (NSG): the NSG attached to “appgwsubnet-dy” is used to restrict inbound traffic coming from the Internet to the Application Gateway. Then there’s the default NSG create for the Virtual Machine which will be attached y default to the NIC of the VM
1 Create an Application Gateway
In the previous post we created a Vnet for our Web App and made it reacheable only from a private network by creating a private endpoint. We will now publish our Web App to the internet while maintaining connections from the private network routed internally.
We’re going to setup the Application Gateway that will publish the private Web App to the Internet. Search for “Application Gateway” and select it, then click on create:

Select the resource group, name your application gateway, select your region and Standard V2 for Tier. This Application Gateway doesn’t need autoscaling or availability zones.

For the virtual network, we will use the subnet appgwsubnet-dy

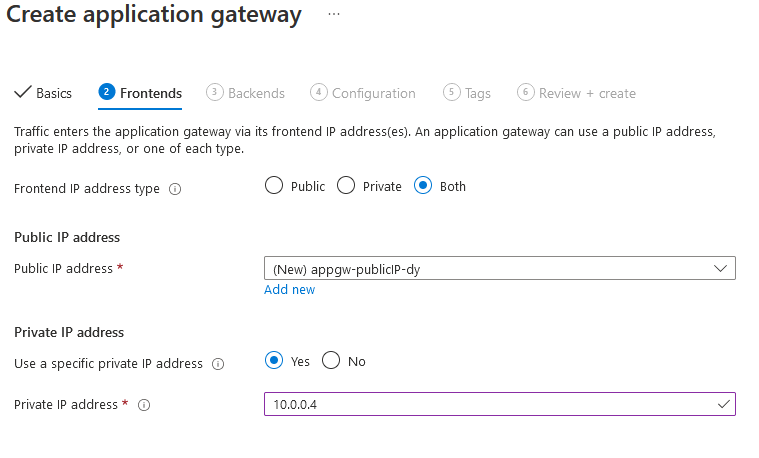
Click OK and the “Next: Frontend”. In this section for Frontend IP address type select “Both”.

For Public IP address select “Add new”, write a name for your public IP and click OK:

For Private IP address select “use a specific private IP address” and select an IP address from the “appgwsubnet-dy”range created in the previous step. In this case the first available IP address not reserved by Azure is 10.0.0.4. Clic Next: Backends
We will add a backend pool which points to the URL of our Web App:
Name: backendpool-dy

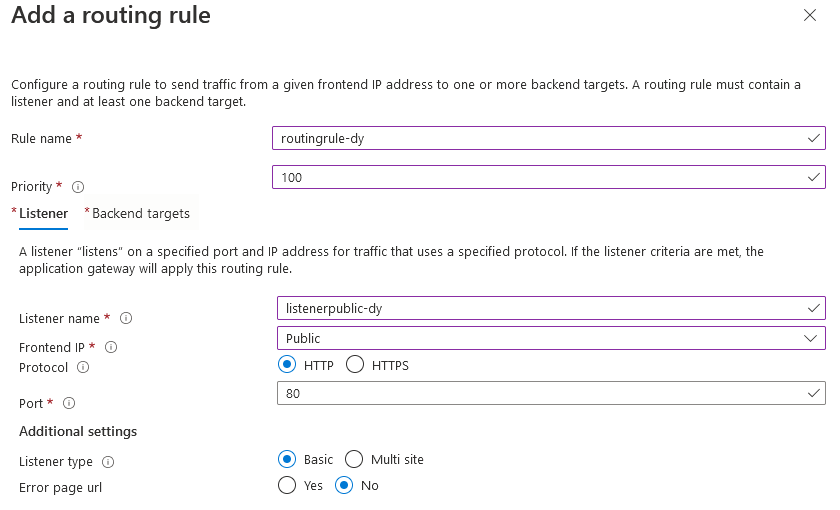
Finally, we will add a routing rule that will tie together the listener, the backend pool and the backend setting:
- Name: a name for the routing rule in this case I choose “routingrule-dy”
- Priority: 100
- Listener Section: Listener name: enter a name for the listener
- Frontend IP: Public
- Protocol: HTTP
- Port: 80
- Listener type: Basic
- Error page url: No
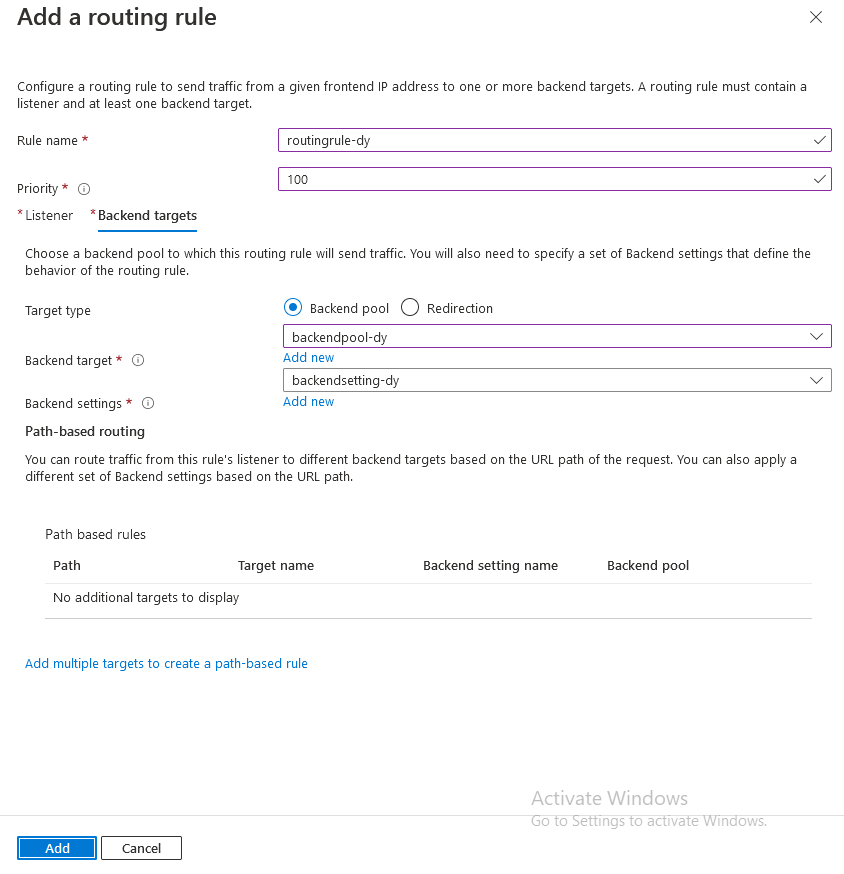
Backend targets Sections:
- Target type: Backend pool
- Backend target: select the backendpool created in the previous step, in this case backendpool-dy
- Backend setting: select “Add new”

In the “add Backend setting” set the following values:
- Backend settings name: the name of your backend setting, in this case “backendsettings-dy”
- Backend protocol: HTTP
- Backend port: 80
- Cookie-based afinity: Disable
- Connection Draining: Disable
- Override with new host name: Yes -> Pick host name from backend target
- Leave the rest of the settings by default then click on Add

Click on Add
Then click Next: Tags, then Next: Review + Create, then Create.
At this point you should be able to access the WebApp through the Application Gateway Public IP. To know which Public IP the Application Gateway is using go to Overview section of the Application Gateway:

Open a browser in your local computer and navigate to http://<Public IP of your Application Gateway>, you should be able to access the Web App:

Create a NSG to secure the Public IP of the Application Gateway
Now, let’s say that we need to restrict specific IP’s from accessing our Web App from the Internet. It is not intuitive that a Network Security Group attached to the private subnet used by the Application Gateway also secures it’s Public IP. Let’s try to find out if you can secure the Public IP with such NSG:
Create a NSG by seaching Network Security Group:

You will see an existing NSG which was created for the Virtual Machine automatically, this NSG is only securing the VM so we need to create a new one. Click “Create”:

Select the Resource Group where the Application Gateway is created, select a name for the NSG,, and select the same region as the Application Gateway and click “Review + Create”, and then “Create”.

When de deployment is finished, go the the newly created NSG in the “Inbound security rules”, then click on “Add”

First we need to create a rule for allowing the management traffic from Azure to the Application Gateway, this is a prerequisite for any NSG attached to the subnet of an Application Gateway and is documented here.
- Source: Service Tag
- Source service tag: GatewayManager
- Source port ranges: *
- Destination: Any
- Service: Custom
- Destination port ranges: 65200-65535
- Protocol: TCP
- Action Allow:
- Priority: 100
- Name: AppGW-management-rule

Click on “Add”, you should see the new rule in the list:

Next, we need to add a rule to allow incoming traffic on the same port 80 of the Application Gateway listener we configured before:
- Source: Any
- Source port ranges: *
- Destination: Any
- Service: Custom
- Destination port ranges: 80
- Protocol: TCP
- Action: Allow
- Priority: 100
- Name: AppGW-listener-80

Click on “Add”. The rule will be added to the list:

Now, we need to attach this NSG to the subnet used by the Application Gateway. Go to the “Subnets” section and click “Associate”:
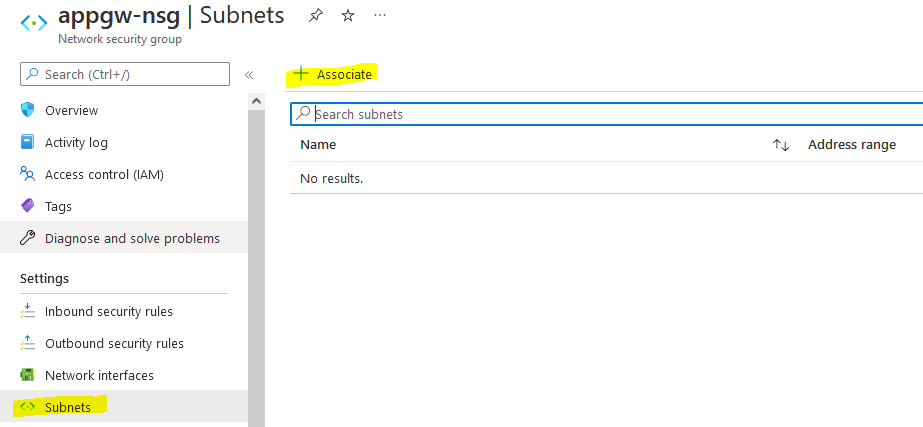
Select the vnet and subnet used by the Application Gateway and click “Associate”

The NSG is now securing the subnet “appgwsubnet-dy” used by the Application Gateway:

Until here, the NSG is not restricting any incoming traffic for port 80, so we should still be able to access the Web App through the Application Gateway Public IP:

Now let’s say we need to restrict the connection from an specific Public IP, in this case we will use the Public IP of our local computer. To find out your Public IP you can use https://whatismyipaddress.com/ website or similar. At the time of this writing, the Public IP of the local computer being used is 181.67.170.218 so we will now restrict the access from that IP by creating a rule in the NSG:
- Source: IP Addresses
- Source IP Addresses/CIDR ranges: <the Public IP of your local computer>
- Source port ranges: *
- Destination: Any
- Service: Custom
- Destination port ranges: 80
- Protocol: TCP
- Action: Deny
- Priority: 105 (make sure this is lower than the previous rule so it can be processed before the Allow rule)
- Name: AppGW-listener-80

Click “Add”, the Client-restrict-90 rule is now applied:

If we try to navigate from our local computer to the Public IP of the Application Gateway the connection will timeout. Make sure to clear the cache and close and reopen the browser:

We can also try to navigate from the Virtual Machine to the Public IP of the Application Gateway and it should reach the Web App. since there’s no rule restricting traffic from other Public IPs.

Leave a comment